windows小技巧集锦,持续更新中......

瘟到死小技巧

找不到gpedit.msc

主要原因是你的Windows系统版本是家庭版,不具备这个功能,今天来个教程,让家庭版也能使用它。

新建如下bat文件,右键管理员运行

@echo off

pushd "%~dp0"

dir /b C:\Windows\servicing\Packages\Microsoft-Windows-GroupPolicy-ClientExtensions-Package~3*.mum >List.txt

dir /b C:\Windows\servicing\Packages\Microsoft-Windows-GroupPolicy-ClientTools-Package~3*.mum >>List.txt

for /f %%i in ('findstr /i . List.txt 2^>nul') do dism /online /norestart /add-package:"C:\Windows\servicing\Packages\%%i"

pause

家庭版开启hyper v

新建如下bat文件,右键管理员运行

pushd "%~dp0"


dir /b %SystemRoot%\servicing\Packages\*Hyper-V*.mum >hyper-v.txt


for /f %%i in ('findstr /i . hyper-v.txt 2^>nul') do dism /online /norestart /add-package:"%SystemRoot%\servicing\Packages\%%i"


del hyper-v.txt


Dism /online /enable-feature /featurename:Microsoft-Hyper-V-All /LimitAccess /

无法关闭防病毒实时保护

有的时候需要运行od等工具,实时保护会自动删除文件。你会发现关闭不了实时保护

这时候只需要win+r运行gpedit.msc,如下设置就可以了。如果找不到gpedit,参考上一条

20221021092037

开启OpenSSH

  1. 打开“设置”,选择“应用”>“应用和功能”,然后选择“可选功能” 。
  2. 扫描列表,查看是否已安装 OpenSSH。 如果未安装,请在页面顶部选择“添加功能”,然后:
  3. 查找“OpenSSH 客户端”,再单击“安装”
  4. 查找“OpenSSH 服务器”,再单击“安装”

修改sshd配置C:\ProgramData\ssh如下

# This is the sshd server system-wide configuration file.  See
# sshd_config(5) for more information.

# The strategy used for options in the default sshd_config shipped with
# OpenSSH is to specify options with their default value where
# possible, but leave them commented. Uncommented options override the
# default value.

#Port 22
#AddressFamily any
#ListenAddress 0.0.0.0
#ListenAddress ::

#HostKey __PROGRAMDATA__/ssh/ssh_host_rsa_key
#HostKey __PROGRAMDATA__/ssh/ssh_host_dsa_key
#HostKey __PROGRAMDATA__/ssh/ssh_host_ecdsa_key
#HostKey __PROGRAMDATA__/ssh/ssh_host_ed25519_key

# Ciphers and keying
#RekeyLimit default none

# Logging
#SyslogFacility AUTH
#LogLevel INFO

# Authentication:

#LoginGraceTime 2m

RSAAuthentication yes
PubkeyAuthentication yes
PermitRootLogin yes

#PermitRootLogin prohibit-password
#StrictModes yes
#MaxAuthTries 6
#MaxSessions 10

#PubkeyAuthentication yes

# The default is to check both .ssh/authorized_keys and .ssh/authorized_keys2
# but this is overridden so installations will only check .ssh/authorized_keys
AuthorizedKeysFile .ssh/authorized_keys

#AuthorizedPrincipalsFile none

# For this to work you will also need host keys in %programData%/ssh/ssh_known_hosts
#HostbasedAuthentication no
# Change to yes if you don't trust ~/.ssh/known_hosts for
# HostbasedAuthentication
#IgnoreUserKnownHosts no
# Don't read the user's ~/.rhosts and ~/.shosts files
#IgnoreRhosts yes

# To disable tunneled clear text passwords, change to no here!
#PasswordAuthentication yes
#PermitEmptyPasswords no

# GSSAPI options
#GSSAPIAuthentication no

#AllowAgentForwarding yes
#AllowTcpForwarding yes
#GatewayPorts no
#PermitTTY yes
#PrintMotd yes
#PrintLastLog yes
#TCPKeepAlive yes
#UseLogin no
#PermitUserEnvironment no
#ClientAliveInterval 0
#ClientAliveCountMax 3
#UseDNS no
#PidFile /var/run/sshd.pid
#MaxStartups 10:30:100
#PermitTunnel no
#ChrootDirectory none
#VersionAddendum none

# no default banner path
#Banner none

# override default of no subsystems
Subsystem sftp sftp-server.exe

# Example of overriding settings on a per-user basis
#Match User anoncvs
# AllowTcpForwarding no
# PermitTTY no
# ForceCommand cvs server

Match Group administrators
AuthorizedKeysFile __PROGRAMDATA__/ssh/administrators_authorized_keys

复制需要免密登录的公钥到C:\ProgramData\ssh 文件夹下,还要改名成 administrators_authorized_keys

cat id_rsa.pub >> administrators_authorized_keys

启动sshd服务

# Start the sshd service
Start-Service sshd

# OPTIONAL but recommended:
Set-Service -Name sshd -StartupType 'Automatic'

# Confirm the Firewall rule is configured. It should be created automatically by setup. Run the following to verify
if (!(Get-NetFirewallRule -Name "OpenSSH-Server-In-TCP" -ErrorAction SilentlyContinue | Select-Object Name, Enabled)) {
Write-Output "Firewall Rule 'OpenSSH-Server-In-TCP' does not exist, creating it..."
New-NetFirewallRule -Name 'OpenSSH-Server-In-TCP' -DisplayName 'OpenSSH Server (sshd)' -Enabled True -Direction Inbound -Protocol TCP -Action Allow -LocalPort 22
} else {
Write-Output "Firewall rule 'OpenSSH-Server-In-TCP' has been created and exists."
}

代码页错误

visual studio打开linux下源文件时,不识别导致编译错误,只需要

项目->属性->配置属性->c/c++->命令行中的其他选项添加/utf-8即可

20221013103911

创建文件夹硬链接

cmd下直接mklink /J to from,注意windows路径是右斜杠\

mklink /J D:\project\1984\source C:\Users\xiao7\OneDrive\文档\source

终端代理设置方法

windows cmd

set http_proxy = "http://127.0.0.1:1189"
set http_proxy_user=
set http_proxy_pass=

powershell

启动配置文件为 $HOME\Documents\WindowsPowerShell\Microsoft.PowerShell_profile.ps1

$env:all_proxy="socks5://127.0.0.1:10808"
$env:http_proxy_user=
$env:http_proxy_pass=

powershell设置脚本策略

启动 Windows PowerShell 时,执行策略是默认的Restricted > Restricted 执行策略不允许任何脚本运行。  AllSigned 和 RemoteSigned 执行策略可防止 Windows PowerShell 运行没有数字签名的脚本。本主题说明如何运行所选未签名脚本(即使在执行策略为 RemoteSigned 的情况下),还说明如何对  脚本进行签名以便您自己使用。有关 Windows PowerShell 执行策略的详细信息,请参阅 about_Execution_Policy。

get-executionpolicy #获取当前册罗
set-executionpolicy remotesigned #设置策略可运行脚本.管理员身份

powershell添加sudo,可写入启动配置文件

function _sudo {
$ss = "$args ; pause"
Start-Process powershell -Verb runAs -ArgumentList $ss
}
set-alias -name sudo -value _sudo #添加sudo命令

vscode设置默认终端

编辑设置文件:AppData.json 添加如下配置:

"terminal.integrated.profiles.windows": {
"PowerShell": {
"source": "PowerShell",
"icon": "terminal-powershell"
},
"Command Prompt": {
"path": [
"${env:windir}\\Sysnative\\cmd.exe",
"${env:windir}\\System32\\cmd.exe"
],
"args": [],
"icon": "terminal-cmd"
},
"Git Bash": {
"source": "Git Bash"
},
"CentOS7 (WSL)": {
"path": "C:\\WINDOWS\\System32\\wsl.exe",
"args": [
"-d",
"CentOS7"
]
}
},
"terminal.integrated.defaultProfile.windows": "Git Bash",

解除uwp应用限制

我们在自由的天空里驰骋,直到我们打开windows邮件.可以在浏览器中操作Gmail,但还是有那么一丁点不爽的。 弄一个客户端吧.作为一个有逼格的程序员,自然要使用微软原生的邮件应用了 那么问题来了,UWP好像不支持代理啊!解决方案有三种,一种是Fiddler,一种是使用命令行,还有一种意想不到

Fiddler解除

第三方软件 Fiddler 可以为 UWP 应用解除网络隔离,在我看来有点高射炮打蚊子了 大家可以自行百度,软件版本不一致,操作方式也不一致,有点小麻烦

  1. Fiddler官方下载地址

  2. 下载安装后,选择顶部菜单栏的「WinConfig」 20220508210144

  3. 在弹出窗口中勾选需要排除网络隔离的应用,最后点击「Save Changes」即可。 20220508210209

Windows自带命令行

Win+r 调出运行,写入cmd,打开命令行

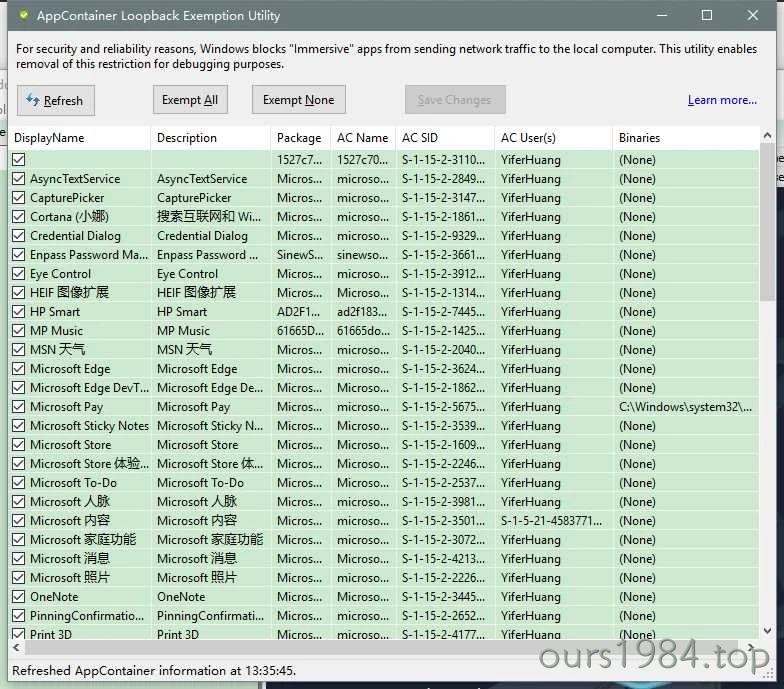
CheckNetIsolation.exe LoopbackExempt -a -p=S-1-15-2-2551677095-2355568638-4209445997-2436930744-3692183382-387691378-1866284433
CheckNetIsolation.exe LoopbackExempt -a -p=S-1-15-2-2750798217-1343590035-1234819260-1030354384-3318145141-3720257911-3461195215

看到-p后面那两个小倒霉蛋了吗?其实它就是我们上一不Findler找到的UWP应用代号,一个是邮件,一个是日历。没错,它们是捆绑销售滴……

  1. 这就已经解除uwp限制了,可以自由登录你的G妹儿啦
  2. 咋还没结束呢!!!
  3. 万一你想恢复,可以这样 CheckNetIsolation.exe LoopbackExempt -d -p=<sid>,sid同样是那俩倒霉蛋

v2rayN隐藏功能

不知道大家有没有发现v2ray的win客户端这个功能,反正我是后面才发现的 20220508210510 点一下这个,你会发现去到了相似的FIddler功能

多选剪切板

win+v 打开新世界. 不用装插件, 一键开启这么简单

win10/win11突破家庭版限制

破解组策略

win10家庭版找不到gpeditmsc是因为win10家庭版默认没有此功能,那么win10家庭版添加gpedit.msc的方法是什么呢?别着急,今天小编就针对win10家庭版组策略编辑器找不到的问题,为大家带来win10家庭版调出组策略的方法。

新建一下bat文件,右键点击该文件图标,在弹出菜单中选择“以管理员身份运行”的菜单项。即可

@echo off

pushd "%~dp0"

dir /b %SystemRoot%\servicing\Packages\Microsoft-Windows-GroupPolicy-ClientExtensions-Package~3*.mum >List.txt

dir /b %SystemRoot%\servicing\Packages\Microsoft-Windows-GroupPolicy-ClientTools-Package~3*.mum >>List.txt

for /f %%i in ('findstr /i . List.txt 2^>nul') do dism /online /norestart /add-package:"C:\Windows\servicing\Packages\%%i"

pause

破解hyperv

如果你是家庭版用户,可能找不到hyperv这个选项,可以使用以下方法突破hyperv。新建一个bat文件如下,使用管理员权限运行,可以在windows功能中找到hyperv

pushd "%~dp0"
dir /b %SystemRoot%\servicing\Packages\*Hyper-V*.mum >hyper-v.txt
for /f %%i in ('findstr /i . hyper-v.txt 2^>nul') do dism /online /norestart /add-package:"%SystemRoot%\servicing\Packages\%%i"
del hyper-v.txt
Dism /online /enable-feature /featurename:Microsoft-Hyper-V-All /LimitAccess /ALL